Home > Articles > Program Small Devices with Big Abilities
Program Small Devices with Big Abilities
This article originally appeared in Nuts & Volts.
Recently I discovered a new way to program small devices while using the same programming language, IDE, and debugger I use for PC applications. The key is the .NET Micro Framework, a special edition of .NET for devices that don’t have the resources to run Windows. You write code in Visual C# and develop and debug using the Visual Studio IDE.
Small devices need I/O, and the .NET Micro Framework supports plenty of it, including basic input and output ports, serial interfaces, networking, USB device functions, and displays—even touch screens. Vendor classes add support for USB host functions and more.
The .NET Micro Framework has expanded my ideas about the kinds of small devices I can create without a big investment in tools and time. This article will show how you can use the .NET Micro Framework in your projects.
A .NET Edition for Devices
Microsoft’s .NET Framework has long been a popular platform for writing applications for PCs. You can program .NET applications in Visual Basic, Visual C#, and other visual languages. (Microsoft supports only Visual C# on the .NET Micro Framework. For more about the language, see Visual C# for Visual Basic Programmers.)
The Framework includes class libraries to support common tasks. For example, the SerialPort class provides properties, methods, and events for communicating with RS-232 and similar serial ports.
The Framework also provides a common language runtime (CLR), which manages program execution. The CLR frees applications from the low-level details of managing memory, threading, exceptions, garbage collection, and security. Visual Studio provides an IDE and debugger for programming in .NET languages.
Small devices that run Windows Embedded can use the .NET Compact Framework. But the .NET Micro Framework goes a step further and provides a way to run .NET programs on devices that don’t use Windows at all. If you have experience with .NET programming on PCs, much about the .NET Micro Framework will be familiar.
Multiple vendors offer modules with support for the .NET Micro Framework built in. A porting kit from Microsoft supports several processors. Most of the modules available from vendors use 32-bit ARM7 or ARM9 CPUs, which have the resources to support running .NET Micro Framework programs.
GHI Electronics has a wide selection of modules. The FEZ serieshas basic interfaces for simpler projects. On the other end of the spectrum, the ChipworkX board supports just about any type of I/O you might want, including a touch panel and USB host and device functions.
Here is a touch-screen data logger I designed on the ChipworkX board:
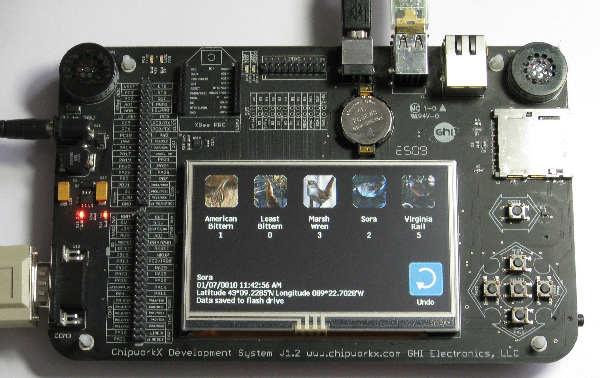
The screen shows images of target bird species. When you touch an image, the logger reads time and location information from a GPS unit and stores the bird type and GPS data on a flash drive.
That’s just one example of what you can do with the .NET Micro Framework. Github has more projects.
Getting Started
The first step in using the .NET Micro Framework is installing the .NET Micro Framework software development kit (SDK) and Visual Studio. Both are free downloads. If you have a paid edition of Visual Studio, you can use it instead of the Express edition. While you’re developing a project, you can run your application on the provided software emulator:

Or you can deploy the application to your hardware. GHI Electronics has a free .NET Micro Framework for Beginners.
The documentation included with the SDK is a little short on explanations and examples of the classes that are specific to the .NET Micro Framework. To fill in the gaps, I found the book Expert .NET Micro Framework, Second Edition by Jens Kuhner (APress) helpful. If you want to dig deep, Microsoft has released most of the source code for the .NET Micro Framework as open source. (It’s in the porting kit.)
Classes for I/O
Small devices often need direct access to port bits, and the .NET Micro Framework adds classes for this purpose.
The OutputPort class defines read/write port bits. The InputPort class supports reading only. On the ChipworkX board, pin PC5 controls an LED. This constructor defines the output port Led1 on PC5 with an initial state of true (logic high).
internal static OutputPort Led1 =
  new OutputPort(Processor.Pins.PC5, true);
To set the bit low and turn off the LED, use:
Led1.Write(false);
To set the but high and turn the LED on, use:
Led1.Write(true);
The InterruptPort class supports events that can respond to a user action or other event at port bit. On the ChipworkX board, pin PA23 connects to a pushbutton. This constructor defines an InterruptPort object on the pin:
InterruptPort port = new InterruptPort(
Processor.Pins.PA23,
true,
Port.ResistorMode.PullUp,
Port.InterruptMode.InterruptEdgeHigh);
Setting the second parameter true enables a glitch filter that ignores switch bounce on mechanical switches. The ResistorMode parameter can set a chip’s internal resistor, if available, to pull-up, pull-down, or no resistor. The InterruptMode parameter specifies whether to trigger an event on a rising edge, falling edge, both, or a high or low level.
The OnInterrupt method assigns a routine to execute when an interrupt event occurs:
port.OnInterrupt += new NativeEventHandler(port_OnInterrupt);
The parameters passed to the port_OnInterrupt routine identify the port and port state and provide a TimeSpan value that indicates when the event occurred. The routine below responds to a switch press by toggling Led1. The routine reads the state of Led1 and writes the opposite state back to the bit. A Debug statement displays the values of the passed parameters in Visual Studio’s Output window:
private static void port_OnInterrupt(uint port, uint state, TimeSpan time)
{
  Led1.Write(!(Led1.Read()));
  Debug.Print("Pin " + port + " State= " + state + " Time= " + time);
}
On pressing button PA23, the LED’s state toggles and the Output window displays the values of the parameters:
Pin 23 State= 1 Time= 00:00:42.2742919
Accessing Serial Ports
To access RS-232 ports, you can use a SerialPort class that is similar to the SerialPort class in the full .NET Framework. This example creates a SerialPort object, sets parameters for communicating with a GPS unit, and opens the port:
private  SerialPort comPort = new SerialPort(
  "COM3", 4800, Parity.None, 8, StopBits.One);
comPort.Handshake = Handshake.None;
comPort.Open();
The constructor sets the port name (COM3) to match the name assigned to the RS-232 port on the ChipworkX board. The port communicates at 4800 bits/sec. with no parity, 8 data bits, and one Stop bit. The Handshake property specifies the type of handshaking (flow control), if any, for the port.
After calling the Open method, the application can read data from the port:
Byte[] receivedDataBuffer = new Byte[comPort.BytesToRead];
comPort.Read(receivedDataBuffer, 0, receivedDataBuffer.Length);
The receivedDataBuffer byte array holds the received data. The BytesToRead method returns the number of bytes waiting in the buffer. The Read method stores the received data in the buffer. The second parameter (0) is the beginning array index for storing the data, and receivedDataBuffer.Length is the number of bytes to read.
The .NET Micro Framework also provides classes for accessing components with SPI and I2C serial interfaces.
Adding a Flash Drive
To access USB peripherals, a device must have a USB host port and support for USB host functions. GHI Electronics provides hardware and software support for accessing a variety of USB peripherals from .NET Micro Framework applications.
Probably the most popular USB device for small systems is flash drives. Accessing a drive requires three steps: detecting and initializing the drive, getting directory and file information, and reading and writing to files.
The built-in support from the .NET Micro Framework and GHI greatly simplifies the code you need to provide. Detecting and initializing a drive requires jumping through a few programming hoops, but the same boilerplate code can do the job for any application, so example code will get you going quickly.
The .NET Micro Framework’s RemovableMedia class provides events for detecting insertion and removal of SD cards and similar storage media. The class’s Insert and Eject events can define handlers that execute on detecting a newly attached or removed RemovableMedia device:
RemovableMedia.Insert += new InsertEventHandler(RemovableMediaInsert); RemovableMedia.Eject += new EjectEventHandler (RemovableMediaEject);
GHI’s SystemManager and PersistentStorage classes enable using these same events to detect attachment and removal of flash drives. The SystemManager class has a Start method that registers a routine that executes when a flash drive is attached or removed:
SystemManager.Start(SystemEvent);
void SystemEvent(SystemEventType type,  SystemEventArgs args)
{
   if (type ==
     SystemEventType.DevicesConnectionChanged &&
     args.device.deviceType == DeviceType.Drive)
   {
     if  (args.isDeviceConnected)
     {
       // A drive has been  attached.
       new PersistentStorage(
       args.device.deviceID).MountFileSystem();
     }
     else
     {
       // A drive has been  removed.

       PersistentStorage[]  storageList =
         PersistentStorage.GetPersistentStorageList();
       foreach  (PersistentStorage myPersistentStorage  in storageList)
       {
         if  (myPersistentStorage.ID == args.device.deviceID)
         {
           myPersistentStorage.UnmountFileSystem();
           myPersistentStorage.Remove();
           break;
         }
       }
     }
   }
}
The parameters received by the SystemEvent routine identify the event type and provide a device ID.
On device attachment, the event routine can use the device ID to create a PersistentStorage object. The MountFileSystem method enables accessing the drive’s directories and files. The new PersistentStorage object appears as a RemovableMedia device, which causes the InsertEventHandler routine to execute.
The InsertEventHandler routine can access a MediaEventArgs parameter that holds information about the drive including whether the drive is formatted, the file system, volume name, root directory, size, and free space. To obtain the directories and files, the System.IO.Directory class provides the GetDirectories and GetFiles methods.
private String rootDirectory = "";
internal void RemovableMediaInsert(object sender, MediaEventArgs e)
{
  if (e.Volume.IsFormatted)
  {
    rootDirectory = e.Volume.RootDirectory;
    string[] dirs = Directory.GetDirectories(e.Volume.RootDirectory);
    string[] files = Directory.GetFiles(e.Volume.RootDirectory);
  }
  else
  {
    Debug.Print("Media not formatted as FAT32.");
  }
}
After an application has detected a drive, reading and writing is similar to accessing drives in programs for PCs.
This example creates a new StreamWriter object for the file mydata.txt in the root directory. If the file doesn’t exist, the constructor creates it. If the file exists, the constructor’s second parameter is set true to append data to the file or false to overwrite the existing file:
String filePath = rootDirectory + "\\" + "mydata.txt";
String stringToWrite = "hello, world";

using (StreamWriter myStreamWriter = new StreamWriter(filePath, true))
{
  myStreamWriter.Write(stringToWrite);
  myStreamWriter.Close();
}
The using statement encloses the code that accesses the file and ensures that the file’s resources are disposed even if an exception occurs when accessing the file. The Write method appends a string to the file. When finished accessing the file, the close method closes the object and its stream.
On device removal, the SystemEvent routine unmounts the file system and removes the PersistentStorage object associated with the device ID. The RemovableMedia class’s Eject event is raised, and the event’s method can inform the application that the device is no longer available.
And Much More
I’ve covered just a few of the Micro Framework’s abilities. One of my favorite features is the support for touch screens, which offer user input and a display in one. You use Windows Presentation Foundation (WPF) classes to place images and text on a screen, respond to touches, and more. Whatever your next project requires, the .NET Micro Framework is worth a look.