Home > Articles > Access USB Devices from a Linux USB Embedded Host
Access USB Devices from a Linux USB Embedded Host
This article is adapted from USB Embedded Hosts: The Developer's Guide. A version of this article appeared in Nuts & Volts as Add USB Devices to Your Projects.
When I begin a project, I like to look for the easy way. Instead of starting from scratch, I try to find building blocks to do some of the work for me. For anything that involves I/O, USB devices are a good bet. Data storage, user input, printing, audio, video, and network communications are just a few of the functions that off-the-shelf USB devices can perform.
To access USB devices, a system must have USB host hardware, enough CPU capacity to manage the bus, and driver code that knows how to talk to the attached devices. PCs have all of these elements built in. But for small systems such as handhelds or any device where system resources are limited, good support for communicating with USB devices can be hard to find.
The best small-system platform I’ve found for accessing USB devices is the BeagleBoard-xM open development board:
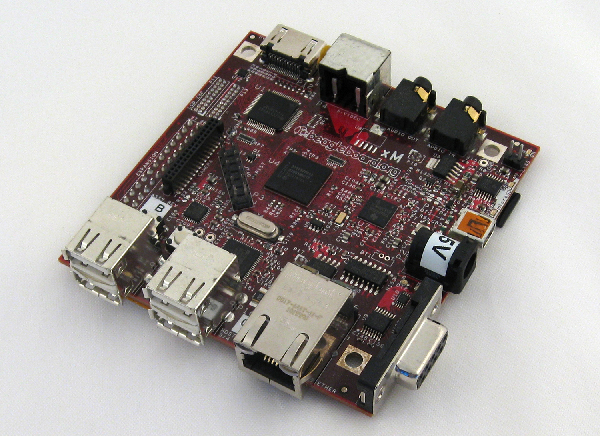
The board has a powerful ARM processor with the resources to run the Linux OS, and Linux in turn has rich support for USB communications (and much more).
If you’ve never used Linux before, the BeagleBoard-xM was as good an excuse as any to dive in. As with any new software, learning Linux takes some time and patience, but the reward is the ability to take advantage of a powerful OS for projects big and small.
This article will show how to get started with the BeagleBoard-xM including how to use a USB mic and speakers to record and play sounds of any kind–bird calls, music, or whatever suits your fancy.
Running Linux in a Small System
The BeagleBoard-xM originated at Texas Instruments, the source of the board’s DM3730 ARM processor. The goal of the project was to create an open-source platform for experimenting and education.
To make the platform as flexible as possible, the board has an abundance of I/O interfaces. The USB support includes four USB host ports and a USB OTG port that can function as either a host or a device port. All of the USB ports can communicate with low, full, and high-speed USB devices. All of the ports support hubs, which means you can add even more devices and extend the cabling. A built-in USB/Ethernet bridge supports network communications.
The board also has a DVI-D monitor connector, a JTAG port for debugging, S-video, stereo in and out, RS-232, LCD headers, and a camera header.
The BeagleBoard’s website has links to vendors that stock the board along with links to an active email discussion group, getting started Wikis, projects, and more.
Unlike many small systems that store their program code in on-board flash memory, the BeagleBoard-xM runs its firmware from a micro-SD card in an on-board receptacle. The card that comes with the board contains a demo version of the Ångström distribution of Linux. Ångström is a stripped-down edition of Linux targeted to small systems. The board can also run other distributions of Linux, including Ubuntu, as well as other OSes. You can swap OSes by swapping cards.
On powering up the board with the provided micro-SD card and an attached monitor and USB keyboard and mouse, you can use the BeagleBoard-xM much like a conventional Linux PC. You can load and run the programs you write and other Linux software as needed. Even if your final project doesn’t need a display and keyboard, having these peripherals available can be a big help when developing and debugging code.
For command-line operations, you can run a terminal-emulator program by selecting Applications -> Accessories -> Terminal in the GUI:
For tips on using terminal applications, see Five Timesavers for Typing in a Terminal.
Compiling and Running Programs
You can write, compile, and debug your programs right on the BeagleBoard-xM, but a popular option is to use a separate development PC to write and cross-compile programs and then transfer the executable files to the BeagleBoard-xM. The development PC can be just about any PC with a network connection.
Using Linux on the development PC makes sense when you’re developing for Linux on the BeagleBoard-xM. If you don’t have a Linux PC, you can install Linux as a virtual machine in free disk space on a Windows PC. Linux then runs in an application window under Windows. I was skeptical of this approach until I tried it and found that it works very well.
I use VMWare’s free VMPlayer virtualization software and the Ubuntu 11.10 distribution of Linux. Ubuntu is a popular Linux distribution for desktop PCs. VMWare recommends at least 1 GB of free disk space for each guest OS. How-To Geek has a tutorial on installing Linux as a virtual machine under Windows.
For command-line operations, in Ubuntu 11.10 with the Unity desktop, click the Dash home button in the upper left corner of the screen and search for the terminal application.
To enable transferring files between the development PC and the BeagleBoard-xM, connect both the development PC and the BeagleBoard-xM to an Ethernet hub or switch on your local network. If the local network connects to the Internet, you can download files from the Internet directly onto the BeagleBoard-xM.
Installing the Tools
On the development PC, you’ll need a toolchain for cross-compiling programs for the BeagleBoard-xM. I use the free gcc toolchain for C programming. Also useful is the free Eclipse IDE, which provides an environment for writing, compiling, and even remote debugging of programs.
Installing a toolchain and configuring Eclipse for cross-compiling involves many steps. To help you along the way, I’ve posted a guide to cross-compiling that takes you from downloading a toolchain and Eclipse to compiling and running your first program. From there, you can begin developing and running your own programs.
Documentation for many Linux commands and applications is in man pages. To view the man page for the ls command, in a terminal application on a desktop Linux system, enter man ls. To save space, the demo Ångström distribution doesn’t include man pages. A web search will also bring up most man pages.
The Ångström distribution includes the opkg utility for installing software. For example, to install the package alsa-utils, in a terminal application on a system with an Internet connection, enter:
opkg install alsa-utils
The utility locates the appropriate package for the target system and installs the software, updates an existing installation, or notifies you that the installed package is up to date. There’s no need to search the web for the software or figure out which version is the right one for your hardware and OS. The utility does it all for you.
In Ubuntu, the apt-get utility performs a similar function:
sudo apt-get install alsa-utils
Exploring USB Audio
USB supports four transfer types, each optimized for specific uses:
Transfer Type |
Control |
Bulk |
Interrupt |
Isochronous |
Required? |
yes |
no |
no |
no |
Low speed OK? |
yes |
no |
yes |
no |
Error checking? |
yes |
yes |
yes |
no |
Guaranteed delivery rate? |
no |
no |
no |
yes |
Guaranteed max. latency? |
no |
no |
yes |
yes |
Typical use |
enumerate |
printer |
keyboard |
audio |
Isochronous transfers are intended for uses such as streaming audio and video where moving the data at a constant rate is more important than correcting occasional data errors. Isochronous transfers are the most challenging transfer type for small systems because the USB host must send or receive data at a constant rate.
Linux supports isochronous transfers and also has drivers and applications for recording and playing audio (and video too!) The Linux Advanced Linux Sound Architecture (ALSA) component provides sound drivers and other support for audio functions. The ALSA applications aplay and arecord can play and record sounds. Other audio applications such as mplayer and lame add capabilities and support for more file formats.
In Linux, one or more "sound cards" provide audio functions. On the BeagleBoard-xM, the sound card isn’t a separate card but instead resides on the same board as the processor.
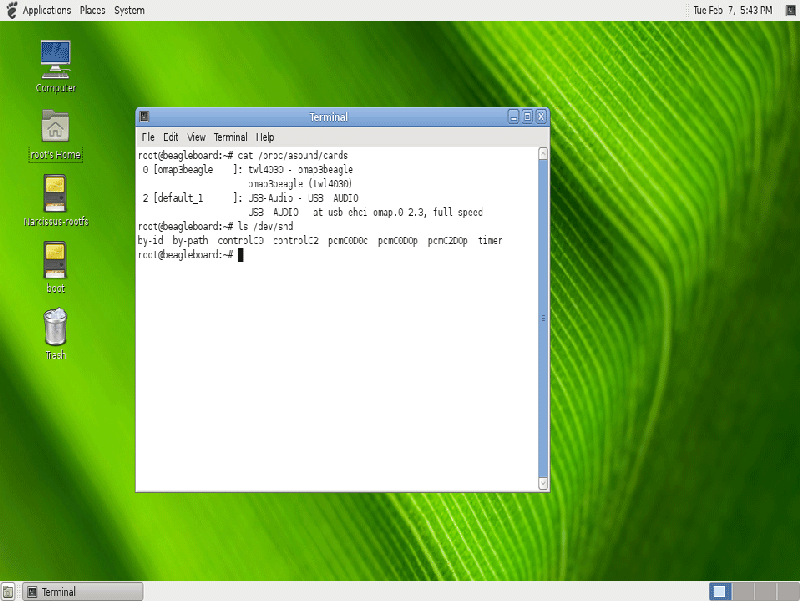
To view the registered sound cards on a system, in a terminal application, enter:
cat /proc/asound/cards
Here are entries for the BeagleBoard’s built-in sound card and USB speakers:
0 [omap3beagle ]: twl4030 - omap3beagle omap3beagle (twl4030)
1 [default        ]: USB-Audio  - USB  AUDIO  USB  AUDIO
  at usb-ehci-omap.0-2.2, full speed
Each entry consists of a card number followed by the card’s name and additional information. In the example above, card 0 is the BeagleBoard-xM’s onboard audio subsystem, and card 1 is attached USB speakers.
An application may specify a device node for playing or recording sound. To view the device nodes, in a terminal application enter:
ls /dev/snd
Here is the command’s output for a BeagleBoard-xM with attached USB speakers:
by-id by-path controlC0 controlC1 pcmC0D0c pcmC0D0p pcmC1D0p timer
To identify which device nodes belong to a USB device, view the /dev/snd directory before and after you attach the device.
In the example above, the USB speakers have two device nodes:
controlC1 is the control device for card 1.
pcmC1D0p is the audio device for card 1, device 0. (A single card can have multiple devices.)
Playing Sounds
The aplay application can play sounds in AU, RAW, VOC, or WAV formats. If not installed, install aplay and related utilities with:
opkg install alsa-utils
This command plays the file bittern.wav on card 1’s device 0:
aplay -D plughw:1,0 bittern.wav
-D plughw:1,0 specifies the output device as card 1’s device 0.
plughw is a plug-in layer that converts a file’s sample format, sample frequency, and number of channels as needed to a format supported by the sound card.
The amixer application can set the volume and other features of the sound card. If not installed, install amixer with:
opkg install alsa-utils-amixer
The -c switch selects a sound card. This command sets the volume of card 1 (-c 1) to 40%:
amixer -c 1 set PCM 40%
The mute and unmute switches turn the audio on and off:
amixer -c 1 set PCM mute
amixer -c 1 set PCM unmute
The mplayer application supports additional file formats including MP3. If not installed, install mplayer with:
opkg install mplayer
This command plays an MP3 file:
mplayer -ao alsa:device=hw=1.0 sora.mp3
-ao alsa:device=hw=1.0 specifies the audio output device (-ao) as card 1’s device 0.
sora.mp3 is the file to play.
The -af option can set the volume:
mplayer -ao alsa:device=hw=1.0 -af volume=10 sora.mp3
-af volume=10 sets a gain of 10 dB. A gain of -200 mutes the sound. A gain of volnorm gives maximum gain without distortion.
This application uses the system command to play a file with mplayer:
#include <stdlib.h>
int main()
{
system ("mplayer -ao alsa:device=hw=1.0 sora.mp3");
return 0;
}
The system command launches the mplayer application. You can use the system command in a similar way to launch other applications from within an application.
Recording Sounds
For recording audio, connect a USB mic to the BeagleBoard-xM. The arecord application included in alsa-utils can record sounds in AU, RAW, VOC, or WAV format.
As before, use the commands cat /proc/asound/cards and ls /dev/snd to view information about the mic.
Use the amixer application to set the volume for the mic:
amixer -c 2 set Mic 100%
-c 2 selects card 2.
Mic 100% sets the gain to 100%.
This command records audio input from a USB mic to the file blackbird.wav:
arecord -D plughw:2,0 -r 16000 -f S16_LE -c 2 -d 3 blackbird.wav
-D plughw:2,0 specifies the input device as card 2’s device 0. The card and device numbers for the mic are in the /dev/snd directory described above.
-r 16000 specifies a sampling rate of 16,000 Hz. The default is 8000. A too-high sampling rate can result in underrun errors and dropouts.
-f S16_LE specifies signed 16-bit, little endian format.
-c 2 specifies using two input channels. The default is one channel.
-d 3 specifies recording for 3 seconds. If you eliminate this option or set it to zero, recording continues until the process ends with Ctrl+C or another means.
To play the recording, use aplay as above with the filename blackbird.wav.
The MP3 format is popular in part because its compression dramatically reduces file size. The lame application can convert a raw file to a compressed file that MP3 players can play. Because MP3 technology is patented, you may need a license to include a compiled version of lame in a commercial product.
Install lame with:
opkg install lame
This example records a raw file and pipes it to lame, which encodes the data and stores the result in a file:
arecord -D plughw:2,0 -r 16000 -f S16_LE -c 2 -t raw -d 3 | lame -s 16 -r - blackbird.mp3
arecord records the file using the same options as the previous example plus the -t raw option to specify raw output format.
| is the pipe operator that writes arecord’s output to lame.
The lame application uses these options:
-s 16 sets a sampling frequency of 16,000 Hz.
-r specifies an output in raw pcm format.
- (hyphen alone) specifies using standard input as the input source. In this example, the standard input to lame is the output from arecord.
blackbird.mp3 stores the recorded mp3 file. Use mplayer as described above to play the file.
Exploring Further
Recording and playing audio is just one example of what you can do with the BeagleBoard-xM and USB. BeagleBoard Linux Code for Accessing USB Devices has code for accessing USB drives, printers, keyboards, virtual serial ports, and more.
Parts List
What you need to develop a project on the BeagleBoard-xM.
BeagleBoard-xM open development board (http://www.BeagleBoard.org)
5V DC 2A power supply, PHIHONG USA PSC12R-050 (available from http://www.DigiKey.com) or similar
Display monitor with DVI-D port
USB keyboard
USB mouse
Linux Development PC (can be a virtual machine, see article) for cross-compiling programs
Network connection to the development PC and the Internet